Open a new document and paste your background paper and photo into your layout.
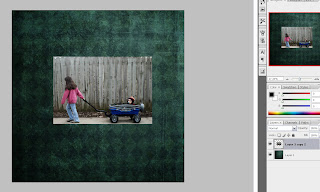
Highlight both layers in the layer pallete by holding the shift button and clicking on the background layer (in the layer palette) and then on the photo layer (again in the layer palette)
Now click on your arrow selector (the first button in your left hand tool bar)
Now along the top tool bar line that give tool specific choices, you will see some squares, rectangles and lines that are grouped together in different arrangement toward the right hand side. You want to bottom align your layers and center them vertically.
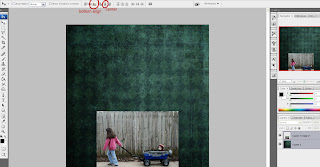
Once this is complete with BOTH layers still selected in your layer palette. Click ctrl+t (or go to the Edit>Free Transform.
Now again you need to look up on your top tool bar. Highlight the number (doesnt matter what it is) in the Y axis box. Then hit your down arrow. This will make your picture and background move UP on your background. You can use the arrow key OR you can enter in a number until you are pleased with where your photo and background are on your layout. Hit ENTER twice or double click anywhere on your screen. This will apply the transformation that you just entered.
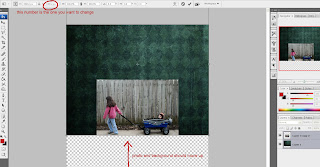
Now duplicate your layers (while both are selected in the layers palette).
With your new layers selected in your layers palette hit ctrl+t again to open your free transform again.
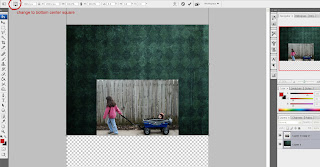
The first button on your top toolbar should look like a square with 9 smaller squares, one highlighted black and all the others white). Select the center bottom square. Then right click on the layout. Hit FLIP VERTICAL. Then hit enter twice. You should now have a reflected background and photo. But we are going to go one step further and make the reflection faded.
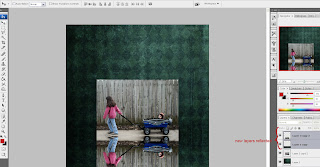
While sitting on your photo layer go to Layer>Layer Mask>Reveal All. This places a "mask" on your photo layer. Since we chose Reveal All you can still see your entire bottom photo, but we are going to put a gradient on it so that we only see the center part of it. Anywhere on your layer mask that is WHITE will show your photo, anywhere that is BLACK will "mask" your photo and cover it up. So a gradient will fade your photo from (white in the center) visible to (black on the outside) invisible. Like a reflection.
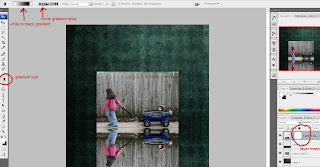
Make sure you are sitting on your layer mask in your layers palette. And go to your flood fill tool and change it to your gradient tool (right click on the flood fill tool). On the top toolbar choose your black to white gradient. And choose your circle gradient (second button in the gradient styles). And choose REVERSE. This will make the black go to the outside of the circle and the white remain on the inside.
While on your layer mask click toward the center of where the photos meet. Hold down your shift button and drag the line toward the bottom of the page. Experiment with how long the line needs to be to create a good reflection.
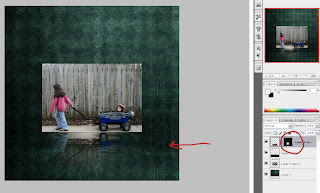
And that is it! You have a reflected photo! Add some more dimension by burning the edges of your paper where the papers meet. And you are done! Have fun with reflecting your photos to create a unique effect to your layouts!



15 comments:
This is so cool. I can't wait to try it.
Suzanne
Thanks for sharing this!
I love this tutorial! You explained the steps so well and I had no problem making my photo reflection page. Thank you!
Oh, fabulous! Thank you so much!
Fab tut!! Thanks
Wow! This is great, I can't wait to try it out. Your instructions are so clear.
Thanks a million - hope you will make lots more tuts - I love learning new techniques!
Oh, how insiring! What a gorgeous layout- I can't believe how much depth and feeling you can get out of your creations- it's just amazing!
Thanks so much for this.
Ooh- I tried it! http://www.digitalscrapbookplace.com/gallery/showphoto.php?photo=300059&ppuser=120608
Thanks for the cool tutorial! Love it! :)
This is so cool! I put your link on Faith Sisters... I am sure the girls there will be stunned! :D
Thank you so very much for sharing. I'm just learning and this looks so fun to do!
Great tutorial!! This will be fun to try! Thank you for sharing it!
I had great fun playing around with this tutorial idea. Thanks for the very clear and easy to follow instructions.
Thank you so much for this Awesome tutorial! The directions were very clear and easy to follow. Cool effect!
Post a Comment